DIY Irrigation System for Fruit Trees
Imagine living in a desert climate and the amount of time it would take to water your garden on a daily basis with nothing but a garden hose. Well, this was the story of my life for 8 years. Both my current residence and previous residence had dysfunctional irrigation systems. There once was a time where I was hand watering my 30 fruit trees, raised bed gardens, and various plants.
When I started Garden of Luma at my current residence in 2016, the irrigation system was non-functional, but on top of that, I was unable to locate the irrigation valves in the backyard. Finally, with the help of a local landscape company, I was able to locate the backyard valves. So in April 2019, it was time to create a functional irrigation system.
Although I appreciate the time I was able to bond with nature, having an automated system has been amazing. Let me walk you through my simple DIY irrigation set-up for fruit trees that can work for you.
Getting Started
Irrigation systems are a great way to water your fruit trees and there are several ways to do this on a budget. I’ve spent some time researching the best ways to water my fruit trees with also considering the cost. Based on my research this system is what worked for me.
When getting started with your irrigation set-up it’s important to figure out the water needs of your tree. My post: How to Water Fruit Trees in Hot Climates the Right Way, can help you out.
If your trees are well established, they’ll need more water, but for shorter durations. Think about the size of your trees. A 15-gallon size tree is going to need around 15 gallons of water.
One final thing to consider is above ground or in-ground irrigation. I placed mine above ground for ease of access to be able to identify potential leaks or to adjust when needed. I’m covering the lines with mulch so they aren’t as visible. If you’re going in-ground, you’ll need a trencher to dig for placement of the lines.
Map it Out

I drew several diagrams of my zones before purchasing parts. Figure out how many zones you are going to utilize and what trees will work well together. For example, your tropical fruit trees are going to utilize more frequent watering needs, then citrus or pomegranates. So, when possible try to put similar types of trees in the same zone.
Taking measurements can help you figure out how much PVC pipe is needed for your project. Also, drawing a map will help you to figure out where you need connectors and how many you’ll need.
Keep in mind that if you have a lot of trees or plants to water the pressure isn’t going to be sufficient to run all your bubblers. Two of the lines I’m running are about 100 feet and the third line is around 200 feet. I have 5 fruit trees, which totals 10 bubblers on the 200-foot line.
I get good flow when 8 or fewer bubblers are running. If I try to do all 10 the pressure diminishes on the last tree. The 100 feet lines run 10 bubblers at a good flow.
What you’ll need for this System
These are all the parts and tools to complete your system. Click on any below for pricing or purchasing options:
- Timer
- ¾ inch PVC Pipe
- Valves
- Pressure Regulator (I use 30 PSI, but could use 25-40)
- Elbow Connecters
- Tee Connectors
- Tee Connectors with 1/2 inch threaded
- End Caps
- Threaded End Caps
- 4-inch risers ½ inch diameter
- Bubblers
- PVC Cement
- Pipe Cutters
- Coupling
- 3/4 inch male threaded
- Teflon or Plumber’s Tape
Step 1: Set-up your Valves
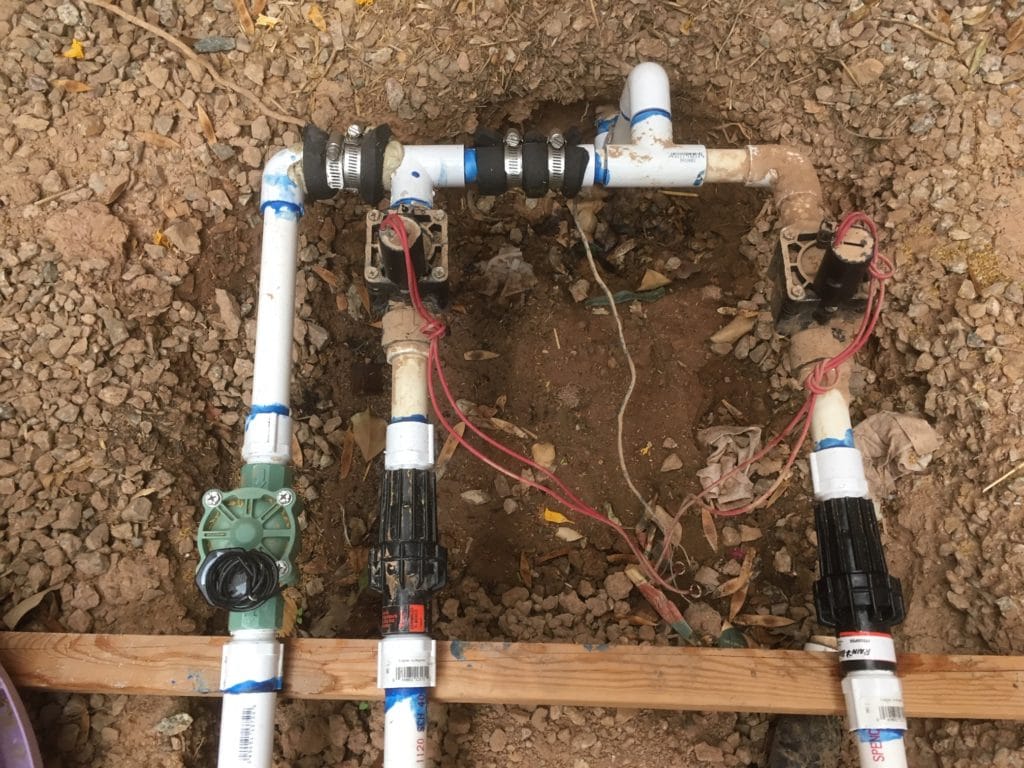
If you already are working with an established irrigation set-up like I was, then it may just be a matter of adding a valve or two. If this is the case just cut the PVC pipe on one end and extend it to add each valve.
Most irrigation set-ups should have a backflow regulator installed but if it isn’t you definitely need to add one. This will prevent contaminants from going back into your water main.
Run the PVC from the water main to each valve. The valves I used had ¾ inch threaded connections on both sides. You’ll need a ¾ in male/female connector, with the male side threaded and the female not threaded.
I use Teflon tape when connecting the threaded sides, by simply wrapping a few layers of tape around the threads before securing them together.
On the opposite side of the valve going to your zones, use the same connector then some PVC followed by your connector for your pressure regulator. A pressure regulator is going to keep from getting to much pressure in your lines which can burst your bubblers. The recommended PSI is 25-40, I went with 30 PSI which is working well for me.
Step 2: Piece it Together
This is the fun part of the job. Think of putting a puzzle together, that’s similar to what you’ll be doing here. It’s cutting and piecing the PVC pipe together to create your zones. Use a generous amount of PVC cement around the ends of your pipe, it can help to scuff up the ends with light sandpaper before applying the cement, then insert them into the connector.
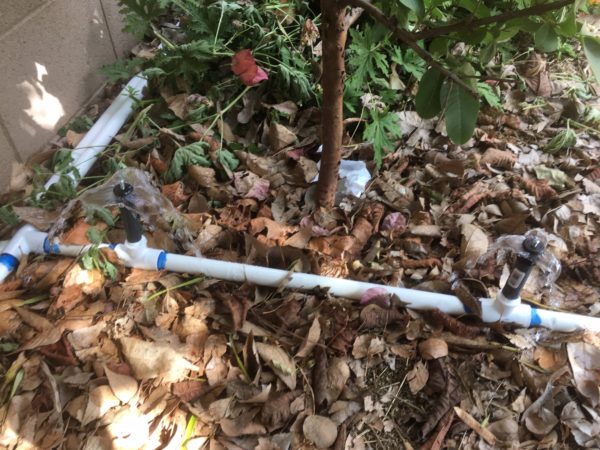
When running the PVC to my individual fruit trees, I run the PVC off of a tee connector so the PVC runs along one side of the tree close to the trunk extending a few inches past the tree well. I place two tee connectors that have ½ inch thread going upright for the risers. Each tee connector should be placed on the root zone that you want the water to flow.
Remember that roots are growing out and are generally as wide as the tree canopy, so you won’t need to place the bubblers right up against the tree. If the tree is newly planted or young, then the bubbler will be closer to the trunk then a more established tree. You can move the bubblers further away as the tree gets larger by cutting and extending the PVC. See picture below for reference.
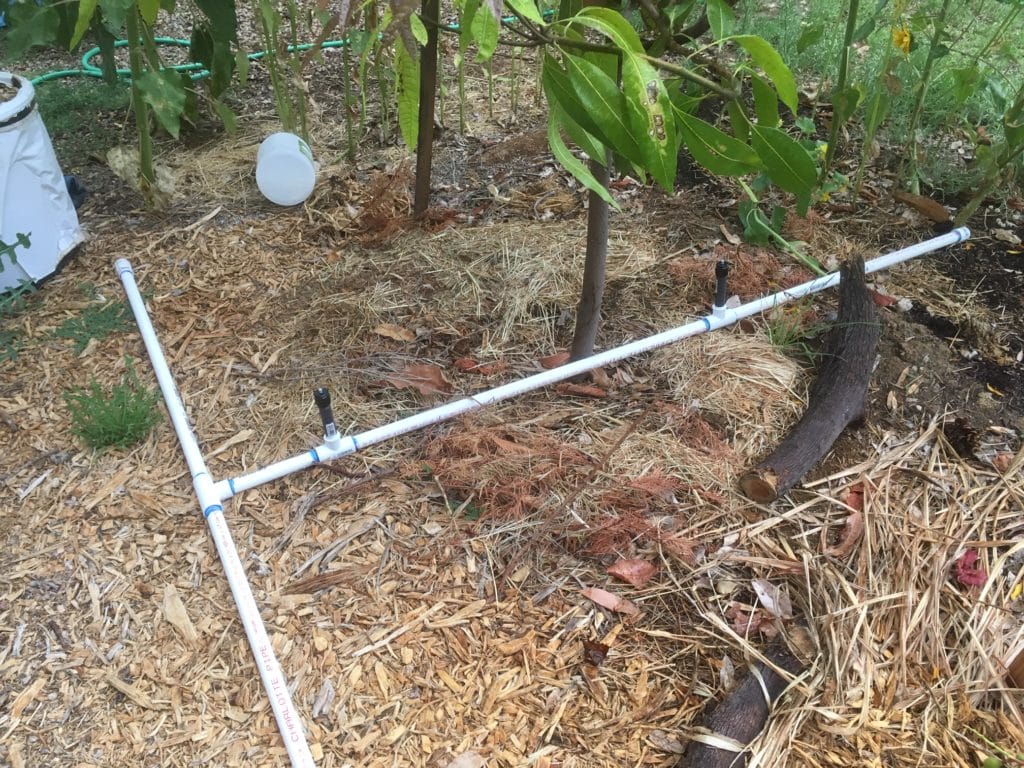
The end of your lines that go to your fruit trees can be capped and the caps can be sealed with PVC cement. It’s important for the end of the line for your zone to be capped with a threaded cap that can be removed to flush the lines for potential debris as needed.
Step 3: Set-up your Bubblers
I utilized 4-inch risers that are ½ inch diameter and inserted the risers into the two tee connectors that were set-up for each fruit tree. Use your Teflon tape around the threads to prevent leaks. Then screw your bubbler head to the other end of the riser.
These bubblers here were recommended to me, but I actually prefer these bubblers. The ones with the screws do seem to be a bit better quality but are more of a hassle to use a screwdriver to turn on and off.
Step 4: Operating the System
Set-up your timer to run each line or you can manually open the valve lines. I like to let my zones run for 15-20 minutes, then allow the water to absorb into the soil for about 30-60 minutes and repeat this cycle 3 times.
The bubblers do a good job flooding the root zone, but you want to make sure that the water is getting deep down into the soil. You can check out my video here for more tips:
Final Thoughts
Setting up an automated irrigation system can save you time and hassle when watering your fruit trees. You’ll still want to periodically check the system to make sure it’s working properly and continue to observe your trees to ensure they’re staying healthy.
It makes it a lot easier to go on vacation or be away from home knowing that your fruit trees will continue to get adequate water. A DIY irrigation project doesn’t have to be an intimidating task and can easily be completed on a weekend following these simple steps.
Please comment below on anything that you’ve enjoyed from this post or your experiences with irrigation set-up.
Thanks for the fruit tree tips! I have several fruit trees. We’ll look into a better irrigation system to keep them happy.